Baldur’s Gate 3 Beast Master Ranger Build Guide – In this Baldur’s Gate 3 Beast Master Ranger Build Guide, I’m going to cover my Ranger Build for Early Access, and show you what I’ve found to work best. I’ll be doing more Build Guides at the launch of Baldur’s Gate 3, but for now, let’s look at how you can use a Beast Master Ranger effectively in the first Act of the game.
Be sure to check out our other Baldur’s Gate 3 Builds for Early Access including: Hunter Ranger, Circle of the Land Druid, Circle of the Moon Druid, Wild Magic Sorcerer, Wildheart Barbarian, Draconic Sorcerer, Berserker Barbarian, College of Lore Bard, College of Valour Bard, Oath of Devotion Paladin, Oath of the Ancients Paladin, Oathbreaker Paladin!
Best Baldur’s Gate 3 Ranger Builds Features
- Abilities: Dexterity, Wisdom
- Subclasses: Hunter & Beast Master
- Unique Feature: Ranged Combat
- Hit Die: +10 HP + CON Modifier
Baldur’s Gate 3 Beast Master Ranger Build Guide
The Ranger is an amazing Class to pick if you’re starting out in D&D 5E or Baldur’s Gate 3 because both of its Subclasses are strong in terms of their overall damage potential. For the Beast Master, even if they don’t have access to the Hunter’s Colossus Slayer to deal additional damage for every Weapon attack, they gain a Beast Companion at Level 3. Every companion has its own abilities from shooting out webs to entrap targets to charging at enemies to knock them down.

What’s more, is that the Beast Master also has Extra Attack by Level 5, allowing them to eliminate threatening targets right away. Similar to the Hunter, they wear Medium Armour to maintain decent AC and they can cast offensive and support Spells on top of wielding a Bow.
Baldur’s Gate 3 Beast Master Ranger Character Creation
In this section, we’ll take a look at how to set up your Ranger during Character Creation for the best results. You don’t have to follow this to the letter, and this will likely change at the full launch of the game. However, this will hold you in good stead during Early Access.
Background
For Background, choosing one that provides you with Dexterity Skills should be enough since this is your primary Ability to hit and damage enemies, alongside Wisdom. Dexterity has Acrobatics, Sleight of Hand, and Stealth. Some Background examples are Charlatan, Entertainer, and Urchin.
Race
The first Race that works well for this Build is the Wood Elf. Wood Elves can reach 17 Dexterity while having a +1 Wisdom bonus. They also gain Proficiency in Perception and Stealth, and they have Darkvision. All of these qualities make them the clear favorite for a Ranger.

Alternatively, you can choose the Strongheart Halfling since they can also reach 17 Dexterity, and gain Lucky, allowing them to make another Attack Roll when they roll a natural 1. They even have Poison Resistance due to Strongheart Resilience as well as +1 Constitution. Last but not least is the Human who has an all-around good Ability Spread. As such, they can reach 16 Dexterity and 16 Wisdom during Character Creation.
Skills
For Skills again it’s not super important, but you’ll have high Dexterity and Wisdom, so selecting Skills that fall under these Abilities is ideal. Wisdom has Animal Handling, Insight, Medicine, Perception, and Survival, and I’ve already listed what Dexterity Skills there are.
Abilities
The primary Abilities that are needed for this Build are Dexterity since you’re going to focus on Bow combat, followed by Wisdom and Constitution. Wisdom is needed to land some Spells while Constitution increases HP and helps to maintain Concentration. Note that if you select the Strongheart Halfling, you can increase Constitution by as much as 16 but Wisdom will only reach a max of 14. Ideally, your Ability Spread looks something like this:

Favored Enemy
Out of all the Favored Enemies, the best one is Bounty Hunter because it imposes a Disadvantage on targets attacked using Ensnaring Strike, specifically when it comes to their Saving Throws and Attack Rolls. What’s more, is that you and your allies gain Advantage on Attack Rolls against them. As a result, they won’t be as effective in combat. Furthermore, the Cantrips featured in other Favored Enemies such as Sacred Flame aren’t that good.
Natural Explorer
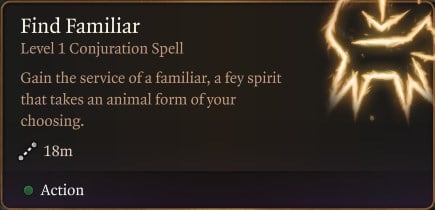
For Natural Explorer, I suggest taking Beast Tamer so you can summon a Familiar that can assist you in combat while waiting for your Beast Companion at Level 3. Just remember to conjure them before the start of every encounter since you can’t do so once you’ve engaged enemies.
Baldur’s Gate 3 Beast Master Ranger Level 2
Fighting Style
At Level 2, you get to choose a powerful passive, and for this Build, I suggest taking Archery to gain +2 Attack Rolls with Ranged Weapons. This will equate to a total of +7 to your Attack Rolls and +8 at Level 4 by taking into account your +2 Proficiency, +2 Archery bonus, and Dexterity Modifier.

Spells
You also gain 2 Level 1 Spells and 2 Spell Slots. Here, you should take Ensnaring Strike and Hail of Thorns. Ensnaring Strike allows you to restrain a target, thereby dealing 1-6 Piercing Damage after every turn if they fail their Strength Saving Throw in addition to the 4-9 Piercing Damage they initially receive.

Meanwhile, Hail of Thorns is an incredibly powerful Spell. If the target fails their Dexterity Saving Throw, they get the entire 5-19 Piercing Damage from the Spell’s thorns and its subsequent explosion. But should they succeed, they still get 4-9 Thorn Piercing Damage plus half of the explosion damage at 1d10 divided by 2. Note that the Ranger’s Dexterity Modifier is added to the Attack and Damage Rolls of the Thorn Piercing Damage. Additionally, remember that Hail of Thorns cannot be cast against an inanimate entity like the Intellect Devourer.
Baldur’s Gate 3 Ranger Level 3
Ranger’s Companion
At Level 3, you’ll be selecting the Beast Master Subclass. As a Beast Master, you have the Ranger’s Companion Class Action, which lets you summon another creature on top of the Familiar that you got from Level 1, allowing for a maximum of 2 animals to assist you in combat. Similarly, it will have be to cast outside of encounters. The ones I tend to use the most are the Bear, Boar, and Wolf Companions.

Similar to the Circle of the Moon Druid’s Bear Wild Shape, your Bear Companion can perform a Goading Roar to incite affected targets to attack it instead, thereby serving as a temporary but decent tank. Meanwhile, the Boar and Wolf can potentially knock multiple enemies or a single foe Prone with Charge and Lunging Bite, respectively, in order to give you the upper hand in combat.
Spells and Replacement Spell
Additionally, you’ll be able to choose a third Ranger Spell. Here, I recommend taking Hunter’s Mark or Cure Wounds. Hunter’s Mark lets you deal 1-6 Slashing Damage against the marked creature every time you shoot them with your arrows. As long as the hunt is completed, which means you’ve slayed the same marked enemy, this Spell will stay with you until you take a Long Rest so you can keep applying it in the next encounters as a Bonus Action instead of spending a Spell Slot.
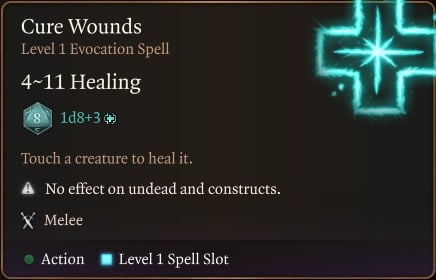
Alternatively, If you’re not running with a Cleric in your party, you may want to take Cure Wounds to be able to heal yourself or an ally you can touch. But remember that since you only have a +2 Wisdom Modifier, the effectiveness of your heals won’t be as high compared to choosing the Wood Elf Race in Character Creation.
Furthermore, you’ll be able to unlearn and learn old and new Spells, respectively, via the Replacement Spell, similar to the Warlock. Unlearning a Spell lets you select what you wish to remove from your list. As a replacement, you’ll get to pick one Spell when you level up. But if you want to keep your current list, you can simply ignore this feature and continue to learn new Spells. In this Beast Master Ranger Build Guide, we won’t be unlearning any Spells since the ones we’ve chosen are essential in combat.
Concentration
Concentration is broken if you cast another Cantrip or Spell that also requires Concentration. You can tell which these are because it will say so on the Spell itself. For example, if you cast Ensnaring Strike, but then you cast Hunter’s Mark, you would stop “Concentrating” on Ensnaring Strike and begin Concentrating on Hunter’s Mark.

Moreover, if you take damage while Concentrating on a Spell, you must make a Constitution Saving Throw, and if you fail, then the effect of that Spell ends. Should you succeed in your Saving Throw, you maintain your Concentration and the Spell continues. This is why it’s vital for Rangers to have average to high Constitution because of the Spells that require this Ability and is wasted if it’s constantly broken.
Baldur’s Gate 3 Ranger Level 4
At Level 4, you’ll gain 2 Ability points to place into Dexterity, bringing it to 18 and your corresponding Modifier to +4. This will not only increase the likelihood of you connecting your attacks but also increase your damage by +1.
Baldur’s Gate 3 Ranger Level 5
At Level 5, you gain Extra Attack, which lets you make another attack using your Ranged Weapon and Spells that deal Weapon Damage, allowing you to obliterate powerful enemies.

As a Beast Master Ranger, Companion’s Bond becomes available to you. What this does is it adds your Proficiency Bonus, which is +3 at this level, to your Companion’s AC and Damage Rolls. For instance, if you summon the Bear, its AC will be higher at 15 instead of 12, making it a bit more challenging for enemies to hit the creature.
And finally, you also get to choose 1 Level 2 Spell. I suggest taking Spike Growth or Lesser Restoration.
 Spike Growth allows you to control a large space of the battlefield with thorns that slow creatures down and damage them if they try to move through it. This is an excellent way to keep enemy melee units from getting to your allies and can be invaluable when you’re outnumbered.
 Lesser Restoration lets you cure allies of diseases and conditions by touching them. It doesn’t require Concentration, only a single Action.
Equipment
For this Beast Master Ranger Build, you’ll primarily be wielding a Ranged Weapon such as The Joltshooter or Longbow +1. The Joltshooter not only lets you deal 5-12 Piercing Damage but also grants Lightning Charges upon dealing damage. This gives a +1 Attack Roll bonus together with +1 Lightning Damage. You can obtain this Weapon by doing the Rescue the Grand Duke Quest.
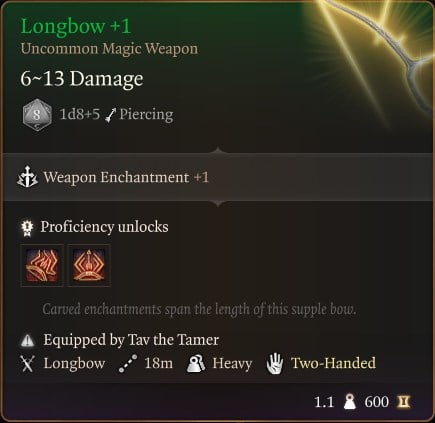
Comparatively, the Longbow +1 deals greater damage at 6-13. Note that both Ranged Weapons have Brace (Ranged). What this Weapon Action does is it grants an Advantage to your Damage Rolls to further improve your chances of dealing greater damage. The only caveat is you can’t move when you use Brace so you have to position yourself optimally right from the start.
For Medium Armor, you can go for Lae’zel’s Githyanki Half Plate or Scale Mail +1 to accommodate +2 of your Dexterity Modifier, giving you a total of 17 AC but you gain a Disadvantage on Stealth Rolls.
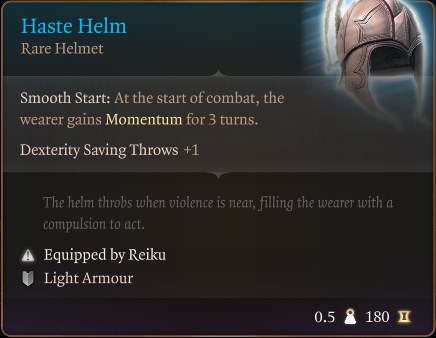
When it comes to Accessories, you’ll be equipping the Boots of Striding, Absolute’s Talisman, and Haste Helm. Boots of Striding is very beneficial to this Build since you have a lot of Spells that require Concentration. Your Movement Speed increases by 3m and you can’t be pushed back or knocked Prone. The Absolute’s Talisman will heal your HP by 1-8 after dealing damage. Both items can be found in the Shattered Sanctum.
Next is the Haste Helm, which is beneficial, especially if you’ve chosen Strongheart Halfling Race due to their relatively lower Movement Speed. With the helm, and at the start of every combat encounter, your Movement Speed is automatically boosted for at most 3 turns, allowing you to easily position yourself optimally.
And finally, there’s the Amulet of Misty Step that’s nice to have. With this amulet from the Underdark, you gain access to the Misty Step Spell to help you teleport from one location to the other, thereby potentially granting you the +2 High Ground bonus for your Attack Rolls upon performing Ranged Attacks.
Final Tips
The Beast Master Ranger is also a great choice because of their straightforward approach to dealing damage. They’re not only experts in restraining enemies and inflicting damage over time but they have the strong support of their companions by being distractions and attacking targets effectively on the battlefield. Additionally, provided that you’re positioned at a safer distance, you won’t have a difficult time succeeding in your Concentration Saving Throws to maintain Concentration on Spells that need it.

To expand on positioning, try to situate your character at Higher Ground compared to your targets when executing Ranged Attacks. Doing so will grant a +2 Attack Roll bonus to boost the Beast Master Ranger’s total Attack Roll to +10 by the time you reach Level 4. This would almost always guarantee a successful hit!
Even though you’re focused on executing Bow attacks, remember to equip 2 Shortswords as your Melee Weapons instead of a Two-Handed Martial Weapon like the Everburn Blade. As a result, you gain the Off-Hand Attack (Melee) Bonus Action, letting you move in for the kill when needed. Usually, you’ll need to switch to Melee Weapons when you incur a Disadvantage with Ranged Attacks since enemies are near you.
Another good Bow to try out is the Spellthief from Auntie Ethel. You not only retain Hamstring Shot and Brace (Ranged), but you also gain Arcane Vehemence. This provides you with an extra Level 1 Spell Slot as long as you execute a Critical Hit with Spellthief, letting you use more of your offensive Spells in return.

Stay tuned for more Baldur’s Gate 3 content as we update the other Builds, and be sure to drop by our Twitch Channel if you have questions about the game. If you need something specific, check out our Baldur’s Gate 3 Wiki which is being worked on night and day!

Log in to leave a Comment