Diablo 4 Necromancer Build – Fate Lancer (LvL 70+): In this Diablo 4 Necromancer Build, I’ll show you how to play a LvL 70+ Fate Lancer Necromancer that’s aimed at World Tier 4. If you’re looking for a Build that focuses on the use of the Blood Lance Ability, then this Diablo 4 Fate Lancer Necromancer Build Guide is for you!
Diablo 4 Blood Necromancer Build – Fate Lancer (LvL 70+)
So just a quick recap on Blood Lance in case you didn’t see the other Diablo IV Builds. This is a Blood Skill that throws at range and sticks into an enemy. And then for every subsequent target you use Blood Lance on, deals damage to the original enemy hit and any others that you attack with it. So you’re able to chain targets together, hitting a wider range of groups. Although, you only have 3 seconds from the time you hit the first enemy with Blood Lance for all the other targets that you attack in order to deal additional damage to that first target.

Because of this, Attack Speed becomes important so that you can get those Blood Lances into enemies quickly. In combination with the Supernatural Blood Lance upgrade, you Overpower on every 6th cast of this Core Skill. And since Patch 1.0.3, you’re able to trigger it 25% more often from the 8th to the 6th cast. What’s really great about Attack Speed is it allows you to get that Overpower Attack fast, letting you get a lot of Overpowers with this Fate Lancer Diablo 4 Necromancer Build.
Another way to activate this is through the Key Passive known as Rathma’s Vigor, which was also buffed in the latest patch. You’re now going to get a guaranteed Overpower Attack every 12 seconds that you remain Healthy instead of every 15 seconds. Chaining enemies together while dealing huge Overpower Damage against them is what you’re aiming for here. However, Overpower doesn’t take advantage of your Critical Strike Damage. It has a Critical Strike Multiplier of 0% natively, no matter what your Critical Strike is, and Vulnerable Damage doesn’t seem to be applied either. This means that both damage types aren’t particularly useful when you Overpower.

But remember that you’re not Overpowering on every attack so when you don’t, then you’ll benefit from dealing Critical Strike Damage and Vulnerable Damage. So there’s a balance between these damage types based on what your gear is. If you don’t have high Attack Speed or all the aspects for this D4 Necro Build, then landing crits and dealing more Vulnerable Damage are both going to play a larger role to compensate for your Overpower Damage.
Diablo 4 Blood Necromancer Build – Fate Lancer (LvL 70+)
Once you hit Tier IV you’ll want to start thinking about min/maxing to get the most out of your Build, and that starts with Skills. Thanks to Paragon Boards and to the increased Equipment affixes, you’ll be able to bypass most of the restrictions you previously faced while leveling up. I also won’t get too deep into Skills, as you most probably know how they work by now.

| LEVEL 70+ NECROMANCER SKILLS | |
| Skill | Points Spent |
| Bone Splinters | 1 |
| Enhanced Bone Splinters | 1 |
| Initiate’s Bone Splinters | 1 |
| Blood Lance | 5 |
| Enhanced Blood Lance | 1 |
| Supernatural Blood Lance | 1 |
| Hewed Flesh | 3 |
| Unliving Energy | 1 |
| Corpse Explosion | 5 |
| Enhanced Corpse Explosion | 1 |
| Plagued Corpse Explosion | 1 |
| Blood Mist | 1 |
| Enhanced Blood Mist | 1 |
| Ghastly Blood Mist | 1 |
| Bone Prison | 1 |
| Enhanced Bone Prison | 1 |
| Ghastly Bone Prison | 1 |
| Grim Harvest | 3 |
| Fueled by Death | 3 |
| Death’s Embrace | 3 |
| Death’s Reach | 3 |
| Gruesome Mending | 1 |
| Coalesced Blood | 3 |
| Tides of Blood | 3 |
| Drain Vitality | 3 |
| Corpse Tendrils | 1 |
| Enhanced Corpse Tendrils | 1 |
| Blighted Corpse Tendrils | 1 |
| Necrotic Carapace | 3 |
| Stand Alone | 3 |
| Memento Mori | 3 |
| Rathma’s Vigor Key Passive | 1 |
Book of the Dead
- Skeletal Warriors – Sacrificed Skirmisher to increase Critical Strike Chance.
- Skeletal Mages – Sacrificed Bone to raise Overpower Damage.
- Golems – Sacrificed Bone to gain increased Attack Speed.

Diablo 4 Blood Necromancer Build: Equipment, Gems, and Aspects
Equipment is the most important part of any Endgame Build, and It’s important to understand that it’s a long-term goal. You won’t have all Paragon Boards available right away, and getting all uniques will probably take a lot of farming, so try to use Legendary Aspects to adjust to your needs while you farm levels and better gear.
Legendary Aspects and Unique Powers
I’ll divide the Equipment into different slots, so it’s easier to understand what you should be using and what affixes you should be looking for. Remember that unique equipment has fixed affixes and powers, so if you are using one, you might need to re-slot a Legendary Aspect into a different piece.
Another important thing to notice is that, when looking for stats, you’ll want to make sure you are fulfilling your Paragon Rare Node requirements. Some rare nodes have very high requirements, and equipment is what allows you to fulfill them. These bonuses often double the rare node effect so, for example, getting an Equipment piece with +100 Dexterity might unlock one or more Node bonuses, giving you a massive bonus as a result.


Helm
Legendary Aspect
Aspect of the Protector: This gives you a damage shield upon facing an Elite or Boss. The Aspect of the Protector is a standard Defensive Aspect.
Affixes
- +Maximum Essence
- +All Stats
- +Maximum Life
- +Total Armor
It’ll also be good to get Cooldown Reduction here instead of All Stats.
Chest Armor
Legendary Aspect
Aspect of Explosive Mist: This makes it so that Blood Mist triggers Corpse Explosion on surrounding Corpses, thereby dealing damage and giving your resources back via Grim Harvest. It also reduces the cooldown of Blood Mist, which is nice. The Aspect of Explosive Mist is a lot better if you’re using Black River because you can detonate up to 5 Corpses with each Corpse Explosion dealing a lot more damage. Plus, you’ll improve your resource gain.
Affixes
- +Maximum Life
- +Blood Skill Damage
- Damage Reduction while Fortified
- Damage Reduction from Distant Enemies
If you have a lot of Damage Reduction on your Chest Armor, you could probably use the Temerity Unique Item on your Legs.
Gloves
Legendary Aspect
Blood Seeker’s Aspect: This increases your damage to the original target by up to 25% for each additional enemy. And so the damage on your first target really ramps up.
Affixes
- +Lucky Hit: Up to a 5% Chance to Heal X Life
- +Lucky Hit: Up to a 5% Chance to Restore X Primary Resource
- +Lucky Hit: Up to an X Chance to Immobilize
- +Lucky Hit: Up to an X Chance to Daze
The other affixes you can look out for when wearing custom Gloves include Ranks of Blood Lance, Attack Speed, and Critical Strike Chance.
Unique Equipment
Fists of Fate: This is a good Unique Item to have because of its Lucky Hit affixes. By remaining Healthier, you boost your damage, plus, your Essence will be topped up. You also have Lucky Hit to Immobilize and Daze enemies so they won’t be able to attack you and Damage to CCed targets apply to both of these. But the best part of Fists of Fate is its core ability where your attacks randomly deal 1% to 300% of your normal damage when you attack so this is great if you have a high roll of 290%+. And since Blood Lance throws rapidly, you’re going to be all over the place. Some hits will be low but some of them will be high so you’ll most likely come out ahead more often than not. When Fists of Fate triggers on an Overpower, it’s going to wipe out everything on the screen.
OR
Frostburn: What I like about Frostburn is it has Critical Strike Chance, and its Lucky Hit triggers on Freezing enemies. When you hit chained targets, the damage will be dealt to each and every one of them before giving you a Lucky Hit Chance to Freeze them as well. This damage can be boosted particularly if you’re using the Control Glyph, which we have for this Fate Lancer D4 Necromancer Build.
Pants
Legendary Aspect
Aspect of Disobedience: This increases your Armor for every damage you deal, stacking up to 50%. The Aspect of Disobedience is pretty rough for this Fate Lancer Diablo IV Necro Build because you don’t spread damage around as much unless you’re using Black River and Corpse Explosive to hit 10 things at once. However, it’s still good for protecting you.
Affixes
- +Maximum Life
- +Ranks of Corpse Explosion
- Damage Reduction while Fortified
- Damage Reduction from Distant Enemies
If you’re not using Black River, you should consider getting Ranks of Blood Mist instead of Corpse Explosion to make Blood Mist have a faster cooldown.
Unique Equipment
Temerity: This gives you a Barrier from all the overhealing you get.
Boots
Legendary Aspect
Aspect of Shared Misery: Upon attacking a CCed enemy, you have a Lucky Hit with up to a 50% chance to make impair another unaffected target. The Aspect of Shared Misery is really good, especially if you’re using Frostburn because you’ll Freeze everything.
Affixes
- +Movement Speed
- +Movement Speed for 4 Seconds After Killing an Elite
- Essence Cost Reduction
- +Strength
Movement Speed is good here since you don’t move quickly as a Necromancer.
One-Handed Weapon
Legendary Aspect
Accelerating Aspect: This makes it so that Critical Strikes with Core Skills, in this case, Blood Lance, increase your Attack Speed by up to 25%. Again, Attack Speed is essential for this Fate Lancer D4 Necromancer Build.
Affixes
- +Damage to Slowed Enemies
- +Vulnerable Damage
- +Intelligence
- +Overpower Damage
For your One-Handed Weapon, you’re better off using a Scythe to gain the Life On Kill affix as it lets you tank through a lot of enemies while you’re just sitting there flinging Blood Lances and you end up topping up your Health.
Unique Equipment
Black River: If you have this Weapon, you can replace the Aspect of Potent Blood with the Accelerating Aspect. Black River detonates many Corpses at the same time, allowing you to factor Corpse Explosion more into this Diablo IV Necro Build.
Offhand Weapon
Legendary Aspect
Aspect of Grasping Veins: It boosts your Critical Strike Chance by up to 20% when you use Corpse Tendrils for 6 seconds. You might be wondering why this Stat is good when I mentioned earlier that it’s not particularly ideal for Overpower Attacks. But that’s because you also gain up to 60% bonus Critical Strike Damage to enemies damaged by Corpse Tendrils. And for whatever reason, the game actually adds this bonus damage to Overpower. So when you Overpower enemies that are also damaged by Corpse Tendrils, you’re going to get the extra Crit Damage boost, which is massive since this is an Overpower Crit. As such, you might also want to consider imprinting the Aspect of Grasping Veins to your Amulet as an alternative.
Affixes
- Cooldown Reduction
- +Critical Strike Chance
- +Lucky Hit: Up to a 5% Chance to Heal X Life
- +Life On Kill
I’ve chosen a Focus as my Offhand Weapon instead of a Shield so that I can slot another Offensive Aspect, which I won’t be able to do if I were to equip a Two-Handed Weapon. Also, Cooldown Reduction is nice for Corpse Tendrils, Blood Mist, and Bone Prison. Now if you have a 40% Critical Strike Chance and you use Corpse Tendrils, you get 20% from the Aspect of Grasping Veins, making it so that you’re 60% more likely to crit. Additionally, anything that gives you Resource Generation, Lucky Hit to provide you with more Essence, and Overpower Damage are also good choices here.


Amulet
Legendary Aspect
Aspect of Hungry Blood: This makes it so that when Blood Lance hits an enemy that’s already been lanced, it has up to a 30% chance to fire another Blood Lance at a nearby enemy since it’s imprinted on an Amulet. But normally, the chance would be 20%. The Aspect of Hungry Blood is very important because it’s going to get you 1 out of every 3 casts or free lances into other targets. As such, the damage will spread around and you’ll end up increasing the damage you deal to that original target due to the higher number of enemies you’ll hit.
Affixes
- Essence Cost Reduction
- +Blood Skill Damage
- +Ranks of the Death’s Reach Passive
- Cooldown Reduction
Essence Cost Reduction is probably the most important affix on your Amulet because you need to reduce the cost of Blood Lance since you fling it so fast with this Diablo IV Necromancer Build – Fate Lancer. Ideally, you’re going to tear through your Essence so if you don’t lower the cost of Blood Lance by 3-5 resources, you’re going to run out of it very quickly. Meanwhile, the Death’s Reach passive increases your damage to distant enemies.
First Ring
Legendary Aspect
Aspect of Rathma’s Chosen: This makes it so that when your Blood Skills Overpower, you gain up to a 50% Attack Speed Bonus for 4 seconds and this raises the speed at which you cast Corpse Explosion and fling your Blood Lances. For instance, if you throw your first lance into an Elite and then all your lances into other enemies, it’s going to ramp up your damage really quickly. Doing so will give you the extra Overpower for every 6 casts.
Affixes
- +Vulnerable Damage
- +Fortify Generation
- +Critical Strike Chance
- +Maximum Life
Ideally though, Vulnerable Damage probably wouldn’t be on this Ring if you’re talking about optimization because you don’t really want to focus on this damage type. Fortified Generation is fantastic though as you deal more Overpowered Damage while Fortified. Maximum Life keeps you alive while also improving your Overpower Damage.
Second Ring
Legendary Aspect
Aspect of Potent Blood: While you’re at full Life, Blood Orbs give you up to 20 extra Essence. What I find good about this is that you tend to be out of Essence at the end of a battle but there will be Blood Orbs left behind. You can just collect them real quick to top you off instead of having to sit there and spam Corpse Explosion. And while you’re in combat, you’ll simply have to move around to gain more Essence.
OR
Aspect of the Umbral: This is a good alternative to gaining Essence since this Diablo IV Necro Build – Fate Lancer does quite a bit of crowd control.
Affixes
- +Vulnerable Damage
- +Critical Strike Chance
- +Maximum Life
- +Damage to Stunned Enemies
Gems
For gems, you’ll want to slot:
- Weapon: Rubies to deal additional Overpower Damage.
- Armor: Rubies to boost your Maximum Life and deal more Overpower Damage.
- Jewelry: Skulls to boost your Defense value.
Paragon and Glyphs for the Necromancer Build
When it comes to Paragon Boards, we are mainly going to aim for Rare Nodes that increase our damage output, as well as Glyphs that synergize with our Build. Please note that the order in which I get the Nodes is just a general guideline, and you can adjust it to your current needs.
First Paragon Board – Base
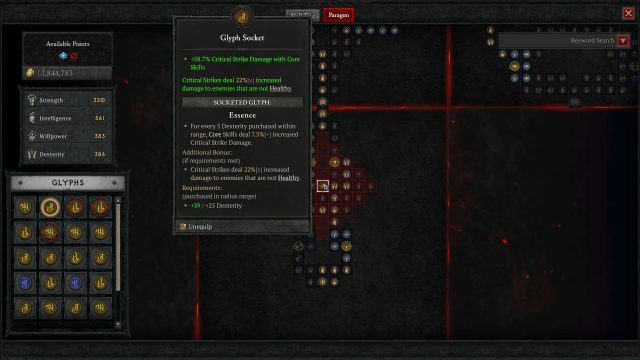
For your first Paragon Board, you’ll want to slot the Essence Glyph to increase your overall Critical Strike Damage. If you meet the requirements, you deal additional Critical Strike Damage to enemies that aren’t Healthy. Again, if you don’t have all the Overpower Damage, aspects, and tons of Paragon points, then Essence is a good Glyph to start out with but you’ll probably replace this later on.

Second Paragon Board – Bloodbath
For your second Paragon Board, you’re going to take Bloodbath and there are a couple of reasons for that. First are the good Rare Nodes that are available to you, and one of them is Powerhouse. This increases your damage while Healthy while also raising your Overpower Damage. There are a lot of clusters around it that further boost your Overpower Damage. Next, you have Thick Hide and Hardened to give you more damage while Fortified, which is great because you’ll constantly be Fortified with this Fate Lancer Diablo 4 Necromancer Build. It’ll also provide you with Maximum Life to keep you alive and boost your Overpower Damage further.

Lastly, you’re going to want to slot the Blood-drinker Glyph to give you a bonus to all Magic Nodes within range. This is ok but not very good for this D4 Necro Build but what you’re really after is the additional bonus, which makes it so that Blood Orbs Fortify you for 7% of your Maximum Life. When you have tons of Maximum Life, you’ll become Fortified quickly, allowing you to deal more Overpower Damage. You’ll also gain damage reduction from your Armor.
Third Paragon Board – Blood Begets Blood
There are a few good nodes for the Blood Begets Blood Tree like Invigorated and Aggression. Invigorated gives you +20% damage for 8 seconds after picking up a Blood Orb and it raises your damage while Healthy. Meanwhile, Aggression gives you 60% Overpower Damage. Now if you meet the bonus requirement, you gain an additional 10% damage, and it even has a lot of extra Overpower Damage nodes around it.

For the Glyph, you’re going to use Dominate to amplify your Overpower Damage for each 5 Willpower you have so you want to make sure to get more of this attribute as possible. When you Overpower against an enemy, all damage they take from you is increased for 5 seconds so you’ll be able to deal more damage.
Fourth Paragon Board – Bone Graft
What you’ll mainly want for the Bone Graft Board is the Rare Node cluster around Reinvigorate to give you Maximum Essence and Essence On Kill. So when you kill enemies with Blood Lance, you can get half the cost of your Blood Lance back if you’ve also managed to get some Essence Cost Reduction.

We’ve also taken the glyph socket here to place the Control Glyph. If you’re using Frostburn or Fists of Fate as well as Corpse Tendrils, you’ll CC enemies quite regularly.
Final Tips
The other 2 Glyphs that are really good for this Diablo 4 Necromancer Build – Fate Lancer that I’ll probably swap in are Imbiber and Undaunted. Imbiber makes it so that for every 5 Willpower purchase, you have increased damage while Healthy, and you’re constantly Healthy. This is over 80% Health because you have so much healing and damage reduction. And so, you’re going to receive a flat upgrade to your damage. Imbiber is probably better than Control because of the similar damage potential and you won’t have to worry if the target is CCed or not. But remember that Bone Graft doesn’t have a lot of Willpower near the glyph socket. What’s more, is that you gain 30% increased Potion Healing as part of the bonus requirements.

On the other hand, Undaunted increases your damage and damage reduction while Fortified. If you meet the bonus requirement, you’re Fortified constantly with this Diablo IV Necro Build. We have so many passives that affect the way you gain Fortify. Willpower is rough to select and any other board than the one we have the Dominate Glyph in so Intelligence unfortunately works better at the moment.
So that wraps up my Fate Lancer Diablo 4 Necromancer Build. Once you set it up and understand the mechanics of Overpower a bit more, you’ll be able to figure out where to get the damage from. There are several options, particularly if you like Freezing enemies.
Stay tuned for more Diablo 4 Builds in World Tier 4 as we continue our 70+ Build Guides. Be sure to check out our Diablo 4 Wiki for any other questions you have about the game and the Builds page if you are looking for more Diablo IV Builds, as well as our Ultimate Beginner Guide and All Classes Overview if you are looking for more Diablo 4 content!
Log in to leave a Comment