In this Baldur’s Gate 3 Build Guide I’m going to be covering my Cleric Build for Early Access, and showing you what I’ve found to work best. I’ll be doing more Build Guides at the launch of Baldur’s Gate 3, but for now, let’s look at how you can use an Cleric effectively in the first Act of the game.
Baldur’s Gate 3 Builds: Cleric Guide (Light Domain)
Clerics in Baldur’s Gate 3 choose their Domain during Character Creation and for this Build, I’m going to be showing you my Light Domain setup. The reason I chose Light Domain is that I wanted to make a Cleric that could deal good damage and still have some support Spells, and Light Domain does a decent job of this. However, you can make this Build for the most part using other Domains in Early Access, but you will miss out on a couple of really strong Spells. Still the concept is basically the same.
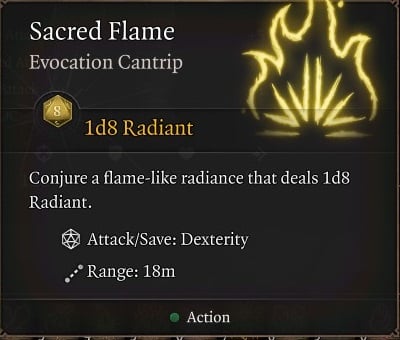
The problem with Clerics in Early Access is that their go to Cantrip for damage: Sacred Flame has a terrible hit chance a large portion of the time. So unlike Warlocks who use Eldritch Blast, and Wizards who use something like Fire Bolt, Clerics have no reliable way to deal damage with Spells every round unless they use their Spell Slots. Because of this they can end up in situations where they have no Spells left to cast, limiting their damage output.

The solution to this problem is focusing on Strength or Dexterity in order to gain some reliable damage and hit chance when using your Weapons. Of the 3 spell casting Classes in Early Access, Clerics will rely much more on their Weapons for damage than either Warlocks or Wizards. For this Build I chose to focus on Dexterity for better Armour Class, and to make my Cleric almost exclusively ranged. However, you can choose Strength if you wish, though this will regulate you to melee, and I found it to be less effective on average in Early Access, but this may not be the case at live release.
Cleric Character Creation
In this section we’ll take a look at how to setup your Cleric during Character Creation for the best results. You don’t have to follow this to the letter, and it’s likely this will change at full launch of the game. However, this will hold you in good stead during Early Access.
Background
Which Background you choose is not particularly important, but you will have a lot of Wisdom so selecting a Background that affects Wisdom Skills is a good choice. Wisdom Skills are: Animal Handling, Insight, Medicine, Perception, and Survival.
Race
The Race I like most for this Build is Wood Elf, because it provides Dexterity and Wisdom, while also providing the Longbow Proficiency. If you don’t have this Proficiency, your ranged damage with Weapons is going to suffer a bit because you’ll be regulated to a Shortbow, but it’s still doable. However, if you’re playing a Strength Cleric that melees instead, Gold Dwarf is a solid choice. It has extra HP, and provides bonuses to Constitution and Wisdom, both valuable to Clerics.

Skills
For Skills again it’s not super important, but you’ll have high Dexterity and Wisdom, so selecting Skills that fall under these Abilities is ideal. Dexterity has: Acrobatics, Sleight of Hand and Stealth, and I’ve already listed what Wisdom Skills there are.
Abilities
Abilities needed for this Build are Dexterity since we’re going to focus on Bow combat when not casting (and it also provides extra AC), and Constitution for HP and to help with Concentration, which I will explain in the next section. Wisdom is also needed to make good use of your offensive Spells, so you’ll want to invest heavily here. Your Abilities should look something like this: STR 10, DEX 16, CON 14, INT 8, WIS 16, CHA 10. This will allow you to hit for decent damage with your Bow, as well as connect with your spells.

Cleric Level 1 Spells, Cantrips & Concentration
During Character Creation you’ll be given many Spells, but you’ll have to choose which to “Prepare”. You can only cast your Cantrips, Prepared Spells, and Spells that are part of the Light Domain, otherwise if you wish to use your other Spells that are not Prepared, you must Prepare them and then Long Rest. You gain Fairie Fire and Burning Hands for being a Light Domain Cleric (at Level 1), so you never have to Prepare these.

Cleric Cantrips
Cantrips are essentially Level 0 “Spells” you can cast at will, and they don’t take up Spell Slots, so they have infinite uses while still allowing you to cast your other Cleric Spells. Sacred Flame is your damage dealing Cantrip, and it generally has terrible accuracy because it targets the Dexterity of enemies (not their Armour Class like Weapon Attacks or Guiding Bolt), and enemies typically have more Dexterity than Armour in Early Access. However, it can be used without line of sight, so that is a major plus.
The Guidance Cantrip is also worth grabbing because it can be used before Lockpicking or dialogues to help influence the outcomes by adding 1-4 to your rolls. However, please note that it has Concentration, and will overwrite any other Spell you are Concentrating on.

Concentration & Warding Flare
Many Cleric Spells like Bless, Bane, Fairie Fire, etc require Concentration to keep the effect active. Concentration can be broken if you cast another Spell that requires Concentration. So for example if you cast Shield of Faith which gives +2 Armour, and then you cast the Guidance Cantrip, you will stop “Concentrating” on Shield of Faith, and begin Concentrating on Guidance losing the +2 Armour. Since Shield of Faith costs a Spell Slot to cast, you will have effectively wasted one Slot.
But, that is not the only way Concentration can be broken. If you take damage while Concentrating on a Spell then you must make a Constitution Saving Throw, and if you fail then the effect of that Spell ends. Should you succeed in your Saving Throw, however, then you maintain your Concentration and the Spell continues. This is why it is important for Clerics to have Constitution, because they have a lot Spells that require Concentration and they are wasted if it is constantly broken.

Clerics of the Light Domain also gain the added benefit of Warding Flare, which allows them once per round to impose Disadvantage on an enemy attack. This drastically reduces the chance they will be struck, allowing them to maintain Concentration a bit more easily.
Level 1 Spells
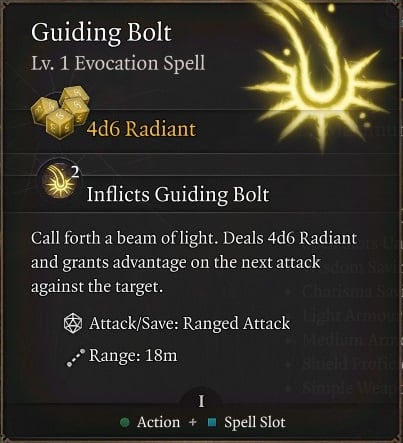
Spells you’ll definitely want for this Build at Level 1 are: Guiding Bolt & Healing Word. Guiding Bolt hits like a truck dealing between 4-24 damage if it connects, and targets the enemy’s Armour Class, much like a Weapon Attack. And just like a Ranged Weapon Attack, if you’re Threatened in combat (an enemy is too close to you), your accuracy will be reduced heavily, so you need to move or Jump out of range to improve your hit chance.

This is one of the reasons this Build is ranged, as it’s much harder to connect with Guiding Bolt while in melee. Add Inflict Wounds if you went Strength, as it does even more damage than Guiding Bolt, and is treated like a Melee Attack, meaning its accuracy is not penalized when enemies are nearby.
Healing Word allows you to heal 1-4 HP, + your Level as a Bonus Action. What’s really great about this Spell is that it will pick up a downed party member if cast on them (just like any healing Spell), and it can do so from 18m away. This allows you to use it and another Spell in the same turn. Winning!
Beyond these two Spells, Bless is not a bad choice as it allows you to buff the Attack Rolls of your party members (as long as you maintain Concentration). Command (Halt) is also a strong Spell, but you may find you need it more later on in the Early Access than at the beginning, where killing things faster is the secret to success. Bane can prevent your party from taking damage, and since enemies need to hit you in order to break your Concentration, this can be a particularly good combination.

You’ll gain Burning Hands and Fairie Fire as Domain Spells, so you can always use these. Burning Hands is a solid conal AoE that has a rather short range, so you may not use it that often, since for this Build you’ll be ranging enemies down. However, if you’re playing a Strength Cleric then you’ll likely use this one fairly often.
Fairie Fire is a very strong Spell that gives your party Advantage on all Attack Rolls against all targets marked with it, which means they get to roll their d20 two times and use the higher of the two values to see if their attacks hit or miss. This is a huge boost, but you must maintain Concentration to keep this effect active, so use it wisely.
Cleric (Light Domain) Level 2
At Level 2 you’ll gain an additional Level 1 Spell Slot, allowing you to cast one more Level 1 Spell before you must Long Rest to replenish them. And you will increase the number of Spells you can prepare from 3 to 5, allowing you more options while on the landscape and in combat.
You will also gain two Channel Divinity Actions, Turn Undead (which all Clerics get) and one specific to your Cleric Subclass. Light Domain Clerics gain the Radiance of the Dawn Action, which allows them to do 2-20 + their Level in damage to all enemies within 9m of them once per day. This is a staggering amount of damage in many cases, and while it’s easier to hit more targets as a melee character, it still works really well when playing ranged. Just remember to use it when you can hit 3 or more enemies, and don’t be afraid to move first to get as many in range as possible.

Cleric (Light Domain) Level 3
At Level 3 you’ll gain another Level 1 Spell Slot, as well as 2 Level 2 Spell Slots. A good support Spell to get is Blindness because it doesn’t require Concentration and it can be cast from a distance. Since this will force the target to roll for a Constitution Saving Throw, you’ll want to cast Blindness against enemies with average HP to improve your chances of successfully blinding them
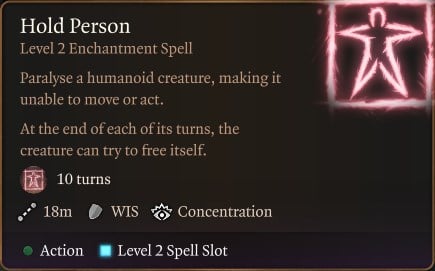
Alternatively, if you don’t have a Ranger in the party who can use Ensnaring Strike to pin down enemies, you can opt to choose Hold Person. One thing to remember is that this Enchantment Spell requires Concentration so you may need to change Concentration Spells in between depending on what you intend to do at the moment. Nonetheless, Hold Person is very effective against any type of creature, allowing you to essentially remove them from the fight.

Light Domain Clerics also gain Darkvision, Scorching Ray, Aid, and Lesser Restoration as Domain Spells, that never need to be prepared. Darkvision is a great way to keep your hit chance up in dark places, or to make another party member have the same benefit. It is semi-permanent once cast, only being removed upon Long Rest.
Scorching Ray allows you to deal 2-12 Fire damage to up to 3 targets or deal up 6-36 Fire Damage to a single target. It’s an incredibly powerful Spell, it has lots of versatility, and is one of the better reasons to take Light Domain in Early Access.
Meanwhile, Aid allows you to further assist your allies when it comes to restoring a portion of their HP and boosting their max HP by 5. This can make or break the encounter, especially when you’re fighting against tougher enemies. Lesser Restoration, on the other hand, removes a Condition affecting the target but it’s worth noting that this Spell’s range is short, which means you’ll need to be within your party member’s range to assist them.

Once you reach Level 3, you’ll also be able to cast some Level 1 Spells as Level 2 versions, using Level 2 Spell Slots instead of Level 1 Spell Slots. This works out tremendously for this Build because it allows you to cast some of the better Level 1 Spells as more powerful versions.
For instance, Guiding Bolt when cast as a Level 2 Spell will deal 5-30, instead of 4-24 damage. Bless at Level 2 will effect 4 targets instead of 3. Healing Word will heal for 2-8 + your Level instead of 1-4 + your Level. In short, this means you can cast your favorite Spells more often, and to greater effect.

Cleric (Light Domain) Level 4
At Level 4 you’ll gain another Level 2 Spell Slot, bringing your total for Early Access up to four Level 1 Spell Slots, and three Level 2 Spell Slots. You’ll also be able to Prepare more Spells, and you’ll gain an additional Cantrip.
You’ll also gain a Feat, and here we’ll select the Ability Improvement Feat, placing both points into Wisdom. This will give your Spells a total of +6 added to their rolls between your Wisdom Modifier (+4) and Proficiency (+2), making it even more likely you will hit your target. You could also place the points instead into Constitution for more HP, and +1 to your Constitution Saving Throws, which helps with Concentration as well. Either choice is fine.
Equipment
For Weapons you’ll want to try to get a Longbow as soon as you can, and there is one for sale in the Druid Grove. You’ll want a Shortsword and a Studded Shield in your melee slot, because Shortswords use Dexterity for their Attack and Damage Rolls. And the Shield will help protect you during the enemies’ turn. Shoot with your Bow, or cast a Spell, then swap to your Shortsword and Shield before ending your turn for an extra 2 Armour Class.
When you reach Grymforge, you can change the Studded Shield for the Adamantine Shield by completing The Adamantine Forge Quest. Although this grants the same Armour Class bonus, it provides you with a unique feature, which will inflict the Reeling Condition against the enemy. When they’re Reeling, their Attack Rolls get penalized by -1 point for the remainder of their turns so they’re not going to be as effective in attacking you and your allies.
For Armour you’ll be using Medium Armour, and the best there is in Early Access is Scale Mail +1 or Githyanki Half Plate (Lae’Zel’s Armour). Use either of these to hit 17 Armour, and 19 Armour when your Shield is out.

Herbalist’s Gloves remove Poison when you heal Poisoned friendlies, which is nice once you reach The Underdark. Broodmother’s Revenge is also excellent, as it adds Poison to your Weapon whenever you are healed. Use Healing Word on yourself, then poison things with your Bow. Profit!
Final Tips
You gain Advantage when using Guiding Bolt, Scorching Ray or attacking with your Bow from elevation, so make sure to get up high at the beginning of combat for improved accuracy. Sacred Flame, Burning Hands, and Radiance of the Dawn do not gain any benefit from elevation, so if you plan to use these on your turn then you don’t need to worry about this.
Darkvision can be cast outside of combat, so if you know you’re going to be fighting in a very dark area, then you can pre-cast it on party members that might need it. This saves you turns in combat to attack or cast other Spells, rather than buffing for several turns. Or if you just want to see better while exploring in dark places, it’s not a bad idea.

I have not added Cure Wounds here, though it is quite a strong Spell in the right hands. This is mostly because it has a very short range: 1.5m, but also because it is a much better use of an Action when used by a Life Domain Cleric who adds an automatic +3 to its healing. Healing Potions or Food are a Bonus Action, and can be used in its stead, allowing for an attack or Spell in the same round. However, if you do decide to use it, I strongly recommend only using the Level 2 version to gain even more healing from a single Action. This will heal for 6-20 at Level 4.
Stay tuned for more Baldur’s Gate 3 content as we take a look at Classes and Builds, and be sure to drop by our Twitch channel if you have questions about the game. If you need something specific, check out our Baldur’s Gate 3 Wiki which is being worked on night and day!

Log in to leave a Comment